Are you facing issues with your Windows 11 operating system, and it seems like there’s no other solution but to start fresh? Reinstalling Windows 11 might be the answer you’re looking for. In this guide, we’ll walk you through the process of reinstalling Windows 11 the easy way, ensuring a hassle-free experience.
Table of Contents
Backing Up Your Data
Before you begin the reinstallation process, it’s crucial to back up your important files and data. This step ensures that you don’t lose any valuable information during the reinstallation.
There are various ways to back up your data:
- External Drive: Copy your files to an external hard drive or USB.
- Cloud Storage: Upload your data to cloud services like Google Drive or OneDrive.
- Windows Backup: Utilize the built-in Windows Backup feature.
Creating a Bootable USB Drive
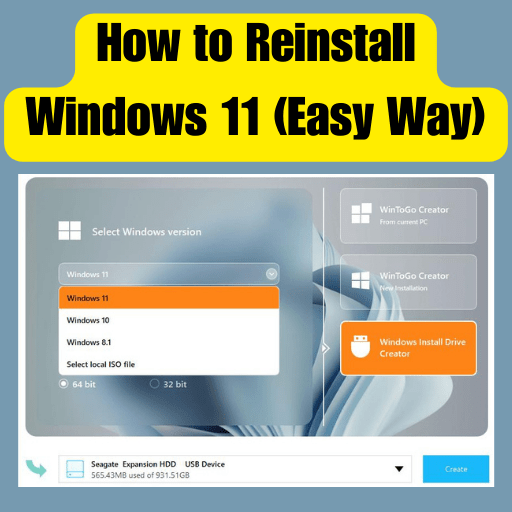
A bootable USB drive is essential for reinstalling Windows 11. It allows you to initiate the installation process and provides flexibility during installation.
Here’s how to create a bootable USB drive:
- Download Windows 11: Obtain the Windows 11 ISO file from the official Microsoft website.
- USB Tool: Use the Windows USB/DVD Download Tool or Rufus to create a bootable USB drive.
- Select ISO File: Choose the downloaded ISO file and follow the tool’s instructions to create the bootable drive.
Read more
How to Easily Move the Taskbar in Windows 11
Accessing BIOS Settings
To begin the reinstallation, you’ll need to access your computer’s BIOS settings and set the boot order to prioritize the USB drive.
Here’s how:
- Restart Your PC: Restart your computer and repeatedly press the BIOS access key (usually F2, F10, or Del) during startup.
- BIOS Menu: Navigate to the Boot tab and change the boot order to prioritize the USB drive.
- Save and Exit: Save changes and exit the BIOS, allowing your PC to boot from the USB drive.
Starting the Installation Process
Once you’ve configured the boot order, restart your computer. The installation process will begin, and you’ll be prompted to choose your language, time, and keyboard preferences.
Follow these steps:
- Language Preferences: Select your desired language, time format, and keyboard input method.
- Install Now: Click “Install Now” to begin the installation process.
Selecting Installation Type
Next, you’ll need to decide whether to perform an upgrade or a custom installation. While upgrading keeps your files and applications, a custom installation provides a clean slate, recommended for a smoother experience.
Choose the custom installation option:
- Installation Options: Select “Custom: Install Windows only (advanced).”
- Drive Selection: Choose the drive where Windows 11 is currently installed.
- Formatting: Click “Format” to wipe the drive, ensuring a fresh installation.
Stay tuned for the continuation of this informative guide on how to easily reinstall Windows 11. We will cover steps such as installing Windows 11, setting up your system, and optimizing performance for a seamless experience. Whether you’re experiencing performance issues or just looking for a fresh start, this guide has got you covered.
Formatting the Drive
Formatting the drive is a crucial step in the reinstallation process. This step erases all existing data, ensuring a clean slate for your new Windows 11 installation.
Here’s how to format the drive:
- Drive Options: In the installation window, select the drive you want to install Windows 11 on.
- Format: Click “Format” to erase the existing partitions on the drive.
- Partition Creation: After formatting, click “Next” to allow Windows 11 to create the necessary partitions for the installation.
Read more
How do I install apps on Windows 10 without Microsoft Store?
Installing Windows 11
With the drive formatted, you’re ready to install Windows 11. The installation process might take some time, so be patient.
Installation steps:
- Copying Files: Windows 11 will start copying installation files.
- Getting Updates: Windows will check for updates and download any required files.
- Product Key: If prompted, enter your Windows 11 product key.
- License Agreement: Read and accept the license terms.
Setting Up Windows 11
Once Windows 11 is installed, you’ll need to go through the setup process.
Setup guide:
- Personalization: Choose your region, keyboard layout, and language.
- Internet Connection: Connect to a Wi-Fi network or use an Ethernet connection.
- Account Setup: Sign in with your Microsoft account or create a local account.
Installing Drivers and Updates
After the initial setup, it’s essential to install the latest drivers and updates to ensure optimal performance and security.
Driver and update installation:
- Windows Update: Go to Settings > Windows Update and check for updates.
- Driver Updates: Visit your device manufacturer’s website to download and install the latest drivers.
Restoring Backed-Up Data
Once your system is up and running, it’s time to restore your backed-up files.
File restoration steps:
- External Drive: Copy your files from the external drive to your new Windows 11 installation.
- Cloud Storage: Download your files from the cloud storage service you used.
Reinstalling Applications
Reinstalling your essential applications ensures that your system is fully functional.
Application reinstallation process:
- Microsoft Store: Download and install apps from the Microsoft Store.
- Third-Party Apps: Download installation files for third-party applications and follow their installation instructions.
Read more
How do I fix a stuck ASUS BIOS?
Enhancing Security
Ensuring your system’s security is paramount. Set up Windows Security features and install reliable antivirus software.
Security steps:
- Windows Security: Configure Windows Security settings for real-time protection.
- Antivirus Software: Install reputable antivirus software and perform a full system scan.
Optimizing Performance
To get the most out of your newly reinstalled Windows 11, consider optimizing its performance.
Performance optimization tips:
- Startup Programs: Disable unnecessary startup programs to improve boot times.
- Disk Cleanup: Use the built-in Disk Cleanup tool to remove temporary files.
Conclusion
Reinstalling Windows 11 doesn’t have to be a daunting task. By following this easy guide, you can refresh your system and enjoy a smoother, faster, and more secure computing experience. Remember to back up your data, create a bootable USB drive, and follow the installation steps to get your PC back in top shape.
This is the final part of this article. I have shared all queries about How to Reinstall Windows 11 (Easy Way). Hope you will understand all about it. If you have any queries regarding this please comment through the box. Don’t forget to share it with your friends & family.
Please click here to see the new post. Thank you!!!
FAQs
Is reinstalling Windows 11 the same as resetting it?
No, reinstalling Windows 11 involves completely wiping the system and starting fresh. Resetting usually keeps your files but reinstalls the system.
Do I need a product key to reinstall Windows 11?
You might need a product key, depending on your previous installation. Keep it handy just in case.
Will reinstalling Windows 11 remove all my files?
Yes, reinstalling Windows 11 will erase all files on the drive where it’s being installed. Back up your data beforehand.
Can I reinstall Windows 11 without a USB drive?
While a USB drive is the easiest method, you can also create an installation disc or use network-based installation methods.
Will I lose pre-installed software during reinstallation?
Yes, you will need to reinstall any software that came pre-installed on your computer after the reinstallation process.
With these steps and tips, you’re well-equipped to tackle the reinstallation process and enjoy a rejuvenated Windows 11 experience.


